1. 📲 Download the Shelly App
📥Download the Shelly app for your phone from the Google Play Store or the iOS App Store and log in.


2. 🌐 Wi-Fi Network Preparation (Router Settings)
🛠️ On your home network, in your router settings (via the app or web browser for your router):
- 🧩 It is recommended (and simplifies management of IoT devices) to create an additional network such as a dedicated IoT or guest network and lock it to 2.4GHz only.
- 📶 Shelly devices operate on 2.4GHz, and bulbs are especially sensitive to interference during setup if the network supports both 2.4GHz and 5GHz.
📌 Tip: It's recommended (but not required) to have your phone on the same 2.4GHz network.
📴 Make sure it doesn’t switch to a better 5GHz network automatically.
📳 For example, turn off “Automatically connect to the best Wi-Fi” on your phone.

3. 🔌 Connect the Bulb
💡 Plug in the Shelly bulb. It will create a temporary Access Point (AP) Wi-Fi network.
📱 Open the Shelly app and tap the ➕ in the bottom-right corner to add the bulb.
- ➕ Select “Add a New Device” > “Add via Wi-Fi (AP Scan)”
- 📡 Confirm that the scan is being done on your 2.4GHz guest network
- 🧭 A list of Shelly devices will appear – select the bulb
- 🔗 Confirm that the bulb will connect to the 2.4GHz guest network
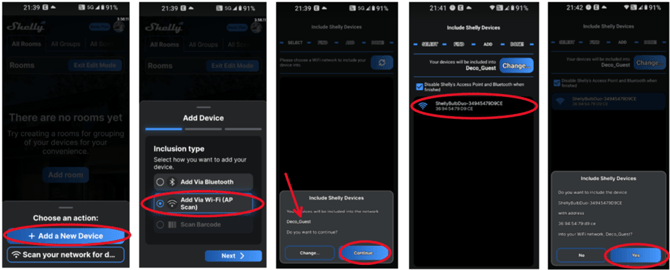
- 🏷️ Name the bulb, assign or create a room, and tap Save

4. 🔄 Final Connection Step
- 🕹️ The bulb will appear in the Shelly app with the status “Pending connection”
- 👆 Tap the bulb icon, and it will finalize the connection with the app and your router
⚠️ If it fails to connect, check that the bulb has a strong enough Wi-Fi signal and that 2.4GHz is enabled.
🕒 Note: Some users report that the bulb can remain in "Pending connection" status but eventually connects after up to 24 hours.
🧩 The cause of the delay is not always known and may vary by environment or router setup.

⚠️ If Something Goes Wrong – Resetting the Bulb
If needed, you can delete the bulb from the app and perform a factory reset.
🗑️ In the Shelly app:
-
- Tap the bulb > scroll to the bottom > select Delete
🔁 On the bulb itself:
-
- Turn the power off and on slowly 5 times
✨ The bulb will blink several times if the reset was successful and will return to factory settings
🔁 Start the setup process again as if it were a new bulb
- Turn the power off and on slowly 5 times

🌐 Connecting to a Shelly Device via Browser on Your Phone
You can also connect to Shelly devices (like bulbs or other models) directly via a browser.
-
🔌 Plug in the Shelly device.
📡 It will create a temporary Access Point (AP) Wi-Fi network.
⚠️ In some cases, this AP is only available for 60 seconds, so act quickly. -
📶 Open your phone’s or laptop’s Wi-Fi settings and look for the Shelly network, e.g. shellyvintage-764CF7
- ✅ Select this network
- 📴 Make sure your phone doesn’t switch to another network (disable “Automatically connect to the best Wi-Fi”)
-
🌍 Open your browser and go to the IP address: 192.168.33.1
- 🧭 This will bring up the web interface for the specific Shelly device
- 💡 You can turn it on/off and configure various settings, including connecting the device to your 2.4GHz home network

📘 More detailed guides available here:
- 📖 Web Interface Guides – Shelly Knowledge Base
- 📚 General Shelly Instructions