📡 AP Mode
🆕 When the Dimmer2 is powered on for the first time, it will start a Wi-Fi Access Point (AP).
❌ If this does not happen, a reset is required.
🔁 Reset
🔌 Disconnect the power from the dimmer briefly.
⏱️ You have 60 seconds to press the secondary switch 5 times (either switch input SW1 or SW2).
🖲️ If you have access to the dimmer itself, hold the small button on the back for 10 seconds.
🌐 The dimmer will then enter AP mode, and you can connect directly to it at IP address 192.168.33.1.
📱 Or use the Shelly app on your phone to add it to your network and account.
⏳ Pending Connection
🕹️ The dimmer will appear in the Shelly app with the status "Pending connection".
🔌 Briefly disconnect and reconnect the power.
📶 The dimmer will then attempt to connect to the app via your router.
⚠️ If it fails to connect, check that 2.4GHz Wi-Fi is enabled and the signal is strong enough.
🌐 Network Settings and Interference
🧩 It is recommended to create a separate network (e.g., IoT or guest network) and lock it to 2.4GHz.
📶 Shelly devices operate on 2.4GHz and may experience interference if the network supports both 2.4GHz and 5GHz.
🌍 If the Shelly device is stuck on "Pending Connection" but you can still access it via its local IP:
🧠 The router may be having trouble connecting to the Shelly server in Serbia.
⏳ In most cases, waiting 4–24 hours is enough for the device to connect automatically.
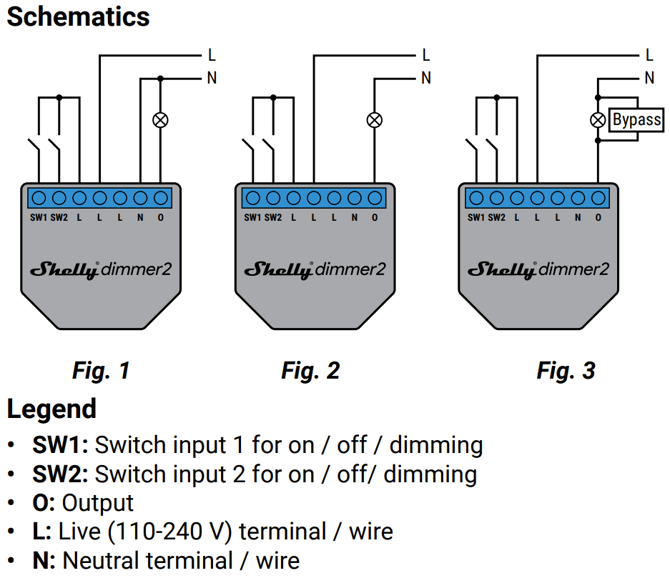
⚡ Connection Without Neutral Wire (Blue Wire, N)
🔌 If no neutral wire is available where the dimmer is installed:
📘 Connect according to Diagram 2 in the manual.
💡 If the dimmable bulb is under 10W, you need to install a Shelly Bypass across the bulb (see Diagram 3).
💡 Important Notes
🔄 If multiple bulbs are connected, make sure they are all the same in wattage and technology.
⚖️ Total power:
- 10–200W for dimmable LED bulbs
- 10–220W for dimmable incandescent bulbs
🚫 Do not use the dimmer to control fans or other devices – only dimmable lights.